
- 1. Introduction and Context
- 2. Bit Manipulation
- 3. Compound Data Types
- 4. Pointers
- 5. Dynamic Memory Management
- 6. Linked Lists
- 7. Abstract Data Types
- 8. File-based Input/Output
1. Introduction and Context
The second year of the “Programming and Software Engineering” class is split into two sections. In the first semester, we continue with intermediate C features like structs and unions as well as dynamic memory management. We introduce the concept of lists, abstract data types (ADTs) and deal with file operations.
In the second semester, we introduce C++ based on the concept of ADTs. Then we are concerned with intermediate C++ features like memory management, const-correctness, references and operator overloading.
This e-book is the main course material for the first part, i. e. it covers the C topics only. The book is meant to be read by students and is thus available in a variety of formats (HTML, PDF, ePub and Kindle).
Topics covered are:
-
C
-
Bit Manipulation
-
Structs, Unions and Enums
-
Pointers and Pointer Arrays
-
Dynamic Memory Management (
malloc/realloc/free) -
Singly and Doubly Linked Lists
-
Abstract Data Types
-
Hash Tables, Trees and Recursive Functions
-
File Operations
-
2. Bit Manipulation
Most times when programming C, we are not interested in the single bits that make up our variables. However, in certain situations, for example when programming an operating system, a driver, etc. we need to control every single bit of some variables exactly. Sometimes, bit-wise operations are also used to increase the efficiency of a program.
In C we can modify the bits of whole-number variables using Logical Bitwise Operators and Bit-Shift Operators.
2.1. Logical Bitwise Operators
Logical bitwise operators can be used to combine the individual bits of two (whole) numbers using the logical functions AND, OR, NOT and XOR.
2.1.1. Operators and Their Truth Tables
The following four logical bitwise operators exist:
|
bitwise AND |
|
bitwise OR |
|
bitwise EXCLUSIVE OR |
|
bitwise NOT (COMPLEMENT) |
Their truth tables are as usual:
a |
b |
a & b |
|---|---|---|
|
|
|
|
|
|
|
|
|
|
|
|
a |
b |
a | b |
|---|---|---|
|
|
|
|
|
|
|
|
|
|
|
|
a |
b |
a ^ b |
|---|---|---|
|
|
|
|
|
|
|
|
|
|
|
|
x |
~x |
|---|---|
|
|
|
|
2.1.2. Example
The following example shows how the operators can be used. On the right hand side you can see the bit pattern of the numbers stored in the variables a, b and c.
1
2
3
4
5
6
7 unsigned char a, b, c;
a = 5; // 00000101
b = 12; // 00001100
c = a & b; // 00000100 = 4 (1)
c = a | b; // 00001101 = 13 (2)
c = a ^ b; // 00001001 = 9 (3)
c = ~a; // 11111010 = 250 (4)
| 1 | The bitwise AND results in a bit pattern with only those bit positions set to 1 where both a and b are 1. So the (decimal) result of 5 & 12 is 4. |
| 2 | The bitwise OR results in a bit pattern where all bit positions are set to 1 where either a has a 1 or b has a 1 (or both). So the result of 5 | 12 is 13. |
| 3 | The bitwise XOR has a 1 whenever only one of a and b has a 1 (which is the case for the first and fourth bit counted from the right). So the result of 5 ^ 12 is 9. |
| 4 | The bitwise NOT inverts all bits (i. e., changes 0s to 1s and vice versa), such that the result is 250. |
2.1.3. Bitwise vs. Logical Combination Operators
|
Do not confuse bitwise (number) operators ( |
Remember that the logical operator && returns true if both of the operands are non-zero, and || returns true if one of its operands is non-zero.
Sometimes the results of using & and && (or | and ||) may be the same, but the following example shows that it is very easy to produce a different result:
int a, b, c;
a = 1;          //   01
b = 2;          //   10
c = a && b;     // = 1 (true)
c = a & b;      // = 00 (false)
2.1.4. Bit Masking
Bitwise operations are often used to modify individual bits of a given variable. This is usually needed in low-level programming, e.g., when writing a hardware driver. The hardware you are interfacing may react to changes of single bits of variables in its memory.
Another situation where you may need to modify the bits of a variable is when trying to use resources very efficiently, e.g. when programming embedded systems. Instead of storing a Boolean value as an integer, you may want to store it as a single bit to save memory.
To set (turn into a 1), clear (turn into a 0) or toggle (turn 0s into 1s and 1s into 0s) certain bits of a variable without modifying any other bit, you use bit masks.
|

Setting Bits
Using the bitwise OR operator, you can set bits. From the truth table (see Truth table of the bitwise OR in section Operators and Their Truth Tables), we can see that
-
the result of the operation
x | 0is alwaysx, and -
the result of the operation
x | 1is always1.

Example
Converting an uppercase letter into a lowercase letter by setting bit 25 (the sixth bit from the right).
This is possible because lowercase and uppercase letters have a distance of 32 (=25) in the ASCII table. A = 65dec = 01000001bin and a = 97dec = 01100001bin.
Setting the 25 bit from 0 to 1 is the same as adding 32.
char c = 'A';       // 0100 0001 (1)
char mask = 0x20;   // 0010 0000 bin = 32 dec = 20 hex (2)
printf("%d / %x / %c\n", c, c, c);
c = c | mask;       // 0110 0001 = 97 dec = 'a' (3)
printf("%d / %x / %c\n", c, c, c);| 1 | In this example, a character variable c is created with the value 65dec. |
| 2 | Then a so-called mask variable is created with a value of 32dec, which is a number that has just the 25 bit set to 1 and all other bits set to 0.
Masks are usually written using the hexadecimal literal notation, because it’s easier to see the mask value (e.g., 0xFF can easily be recognized as 8 bits set to 1 if you get a little bit used to hex). |
| 3 | The mask is then combined with c using the bitwise OR and the value of c is replaced by the result.
This has the effect of setting bit 25 in c while all other bits are unchanged. |
Clearing Bits
In a very similar way, we can clear bits (set them to zero) using AND. From the truth table (see Truth table of the bitwise AND in section Operators and Their Truth Tables), we can see that
-
the result of the operation
x & 0is always0 -
the result of the operation
x & 1is alwaysx.

Example (inverse of the last example)
Converting a character from lowercase to uppercase means that we have to clear bit 25, which is the same as subtracting 32.
char c = 'a';        // 0110 0001 (1)
char mask = 0xDF;    // 1101 1111 bin = 223 dec = DF hex (2)
printf("%d / %x / %c\n", c, c, c);
c = c & mask;        // 0110 0001 = 97 dec = 'A' (3)
printf("%d / %x / %c\n", c, c, c);| 1 | The input is a lowercase a |
| 2 | The mask is 0xDF, because the bit pattern we need to clear bit 25 has a 0 in that position and 1s everywhere else.
If you look up (or convert) the two bytes from 1101 1111 to hex, you end up with D and F. |
| 3 | We combine c and mask using the bitwise AND and store the result in c. It is now an uppercase A. |
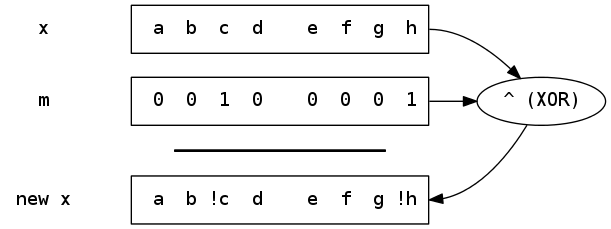
Toggling Bits
In some cases, we do not know whether a bit is 0 or 1, but we want it to be the opposite.
That means, if it’s 0, we want to change it to 1; if it’s 1, we want to change it to 0.
Exactly this operation can be done using the XOR operator.
From the truth table (see Truth table of the bitwise EXCLUSIVE OR in section Operators and Their Truth Tables), we can see that
-
the result of the operation
x ^ 0is alwaysx -
the result of the operation
x ^ 1is always!x(the opposite ofx).
Example
As a consequence, we can also do both of the operations from the examples above using an XOR.
char c = 'A';       // 0100 0001 = 65 dec
char mask = 0x20;   // 0010 0000 = 32 dec = 20 hex
printf("%d / %x / %c\n", c, c, c);
c = c ^ mask;       // 0110 0001 = 97 = 'a'
printf("%d / %x / %c\n", c, c, c);
c = c ^ mask;       // 0100 0001 = 65 = 'A'
printf("%d / %x / %c\n", c, c, c);
In this case, the mask is 0x20 again, because for a toggle operation, the mask needs to have a 1 for all bits that we want to flip.
You can see that we can convert from uppercase to lowercase and the other way around using the same mask and same XOR operation.
|
What is the difference between setting, clearing and toggling?
If we set a bit using OR, it will be That means, toggling is slightly different from setting and clearing and their usage depends on the task we want to solve.
Converting all letters in a text to lowercase using the same operation requires using AND ( |
2.1.5. Shortcut Operators
There are also the shortcut operators &=, |=, ^= and ~=, so that we could have replaced, for example, the instruction c = c ^ mask in the last example with the shorter version c ^= mask, which does exactly the same.
|
2.2. Bit-Shift Operators
With the operators from the previous section, we can modify individual bits in place.
With the binary bit-shift operators << and >> we can also shift the bit pattern of a whole number to the left or right by a certain number of positions.
2.2.1. Bit-Shift Left
Shifting the bits of a number by one position to the left corresponds to a multiplication by 2.
The reason for that is: the significance of every 1 in the number changes from 2i to 2i+1 (= 2 * 2i).
Therefore, shifting the bits by n positions to the left corresponds to a multiplication by 2n!
|
Example
char x = 4;         // 0000 0100 (1)
x = x << 1;         // 0000 1000 = 8 (2)
x = 3;              // 0000 0011 (3)
x = x << 2;         // 0000 1100 = 12 = 3 * 2^2 (4)

// attention
x = 127;            // 0111 1111
x = x << 1;         // 1111 1110 (5)
printf("%d", x); // prints -2 (two's complement!)| 1 | A variable x with data type char (remember: 1 byte) is defined and assigned a value of 4, which consists of one 1 in the position 22. |
| 2 | The bit pattern is shifted by one position to the left, the result is 8 (4 * 2). |
| 3 | The value 3 is assigned to x, which consists of two 1s. |
| 4 | Shifting x by two positions to the left, corresponds to a multiplication by 22 = 4, such that result is 12. |
| 5 | The number 127 is shifted by one to the left. If you print the value of x afterwards, it will be -2.
Reason: x is interpreted using the two’s complement, because it is defined as a signed variable, which can also hold negative numbers (vs. unsigned variables consisting only of positive numbers).
The first bit of the number being 1 indicates a negative number, and using the two’s complement (0000 0001 → 0000 0010) we end up with -2. |
Note that the left shift is NOT circular, that means if you shift bits off at the left hand side (because the data type is not large enough to hold the bits), they are lost and cannot be recovered.
Moreover, if you shift bits off at the left hand side, x << n does not correspond to a multiplication by 2n any longer.
|
Example
char x = 127;       // 0111 1111
x = x << 8;         // 0000 0000
printf("%d", x);    // prints 0, all bits are "lost".
2.2.2. Bit-Shift Right
Bit-shift right is very similar to bit-shift left (of course, in the opposite direction) — shifting a variable by n bits to the right corresponds to a (whole number) division by 2n.
Example
char x = 10;    // 0000 1010
x = x >> 1;     // 0000 0101 = 5 dec (1)
x = x >> 1; // 0000 0010 = 2 dec (2)| 1 | The value 10 is shifted one bit to the right and results in 5.
The left-most bit is filled with a 0. |
| 2 | The value 5 is again shifted one bit to the right.
The right-most 1 is shifted "off" (is lost), which corresponds to losing the remainder of the division by 2.
The result is therefore 2. |
|
What happens with negative numbers?
If you shift a negative number to the right, the result varies from compiler to compiler.
Usually, the compiler fills up the left-most bit with a |
Example
x = -127;       // 1000 0001 (two's complement!)
x = x >> 1; // 1100 0000 = -64| The result of a shift operation is undefined if the right operand is negative or larger than the number of bits of the left operand. |
Example
char x = 5;
x = x << -1;        // undefined operation!
printf("%d\n", x);  // here: 0
x = 5;
x = x << 9;         // undefined operation!
printf("%d\n", x);  // here: 0
There are also the shortcut operators <<= and >>=.
|
Example
Converting binary input (a character sequence of 0s and 1s) to a decimal number:
1
2
3
4
5
6
7
8
9
10
11
12
13
14
15
16
17 #include<stdio.h>
#include<ctype.h>
int main() {
char c;
unsigned int value = 0;
while((c = getch()) != 13)
{
if(c == '0' || c == '1') {
putchar(c);
value <<= 1;
value |= (c - '0');
}
}
printf("\nDecimal value = %d",value);
return 0;
}
The important lines are number 11 and 12: the old value is shifted by one bit to the left.
The new input is converted from ASCII code ('0' or '1') to a decimal value (0 or 1) by subtracting the ASCII value of '0'.
Then the new bit is added on the right hand side using a bitwise OR operation (the right-most bit is replaced by the input).
3. Compound Data Types
We know primitive data types such as integer and float, as well as arrays of primitive data types. Arrays allow us to store multiple values of one data type.
A compound data type is a type that combines different data types into one new type. We will dive into two different compound data types: structures (or structs for short) and unions.
In this chapter we will also discuss enumerations (or enums for short), because they are often needed together with unions and share the definition syntax of structs and unions.
3.1. Structures
A structure (struct, sometimes also called record) is a data type that combines different (primitive or compound) data types into a new one. In contrast to arrays, each component (also called member) of a struct can have a different type. A member can itself be a primitive type, an array, a struct, a union or an enumeration (we will talk about the unions and enumerations later).
3.1.1. Definition and Usage of Structs
There are three different ways of defining a struct, and we will go through all of them, because you will need to known them at some time.
Declaration Variant 1
The first way of defining a struct is using the struct keyword, followed by an identifier (the name of the struct), a list of all members in curly braces and a semicolon.
struct Date {
    char day;
    char month[4];
    int year;
};
By convention, we name structs in upper camel case (e.g., StudentData).
The block in curly braces is called the member definition.
Just like variable definitions, each member consists of a data type and a name.
In this case, we defined a structure to hold the information of a single date.
It consists of three members:
-
dayis acharand can hold a day number like23 -
monthis a string and can hold a month abbreviation like"JAN" -
and
yearis an int and can hold a year number like2016.
To use this struct in a program, we need to define a variable like follows:
struct Date {
    char day;
    char month[4];
    int year;
};
int main() {
    struct Date d1;
}
Again, the keyword struct must be used, followed by the name of the structure. struct Date is the data type of the variable d1.
With this variable declaration, the compiler reserves 9 bytes of memory. Why?
-
char day: 1 byte -
char month[4]: 4 bytes -
int year: 4 bytes (assuming an int has 4 bytes)
A total of 9 bytes are needed to store all three members. In memory, the three members are stored next to each other — at least you can imagine it that way (sometimes the compiler may decide to leave some space between the members for optimization reasons).
So d1 is a name for this 9 byte object in memory:

Accessing Struct Members
Because a struct consists of multiple components with different data types, you cannot access (read or modify) a struct as a whole. Instead, you have to access the members individually using the dot syntax (called member access operator):
struct Date d1;
d1.day = 23; (1)
strcpy(d1.month, "JAN"); (2)
d1.year = 2016; (3)

printf("%hhu %s %d", d1.day, d1.month, d1.year); (4)

// WRONG:
d1 = 23;           // WRONG, which member should be written?
printf("%d", d1); // WRONG, which member should be used?| 1 | The first member, day is assigned a value of 23. You have to write the name of the variable (d1), followed by a dot (.) and the name of the member (day) to access the right memory.
Only the first byte of d1 is changed. |
| 2 | Because month is an array, we cannot assign a string using the assignment operator (=), but we have to use strcpy. Byte 2—5 are changed. |
| 3 | Only the last four bytes of d1 are changed to the integer value 2016. |
| 4 | When reading values from d1, we also have to specify which member should be read.
In this case, to print the date, we have to use three format specifies (according to the data types of the members) and access all three members individually! |
|
When accessing struct members, you have to write the name of the variable ( |
Declaration Variant 2
The second variant is very similar to the first one. However, instead of defining the struct globally, we can also define it directly inside a variable declaration like in the following example:
int main () {
    struct {
        char day;
        char month[4];
        int year;
    } d2;
    d2.day = 31;
    ....
}
In this variant, we do not define a name for the struct, but use the definition syntax to directly define a variable d2 with the same three members as before.
The members day, month and year can be accessed in the same way as above.
This variant is often used when nesting structs inside structs or unions (see section Nesting Structures below). These structs are sometimes also called anonymous structs as they have no name.
|
The disadvantage of this variant is that you cannot define a second variable of the same data type as |
Declaration Variant 3
Because we are actually defining a new data type (and because typing the struct keyword over and over again is cumbersome), we usually use typedef to declare a new data type from the struct:
typedef struct {
    char day;
    char month[4];
    int year;
} TDate;
To understand that definition remember the general typedef structure:
typedef <oldtype> <newtype>;
-
<oldtype>is our struct (in this case without a name, because we are defining a new type name anyway):struct { char day; char month[4]; int year; } -
<newtype>is our new type name:TDate. By convention, we prefix those type names withT.
We can now use the new type without the struct keyword:
int main() {
    TDate d3;
    scanf("%hhu", &d3.day);
    fgets(d3.month, 4, stdin);
    scanf("%d", &d3.year);
}
3.1.2. Nesting Structures
As already mentioned above, a member of a struct can be a struct as well. This comes in handy if you want to define more complex data types.
For example, we could define a type to store information about a person as follows.
typedef struct {
    char day;
    char month[4];
    int year;
} TDate;
typedef struct {
    char firstname[3][21];
    char lastname[41];
} TName;
typedef struct {
    TName name;
    TDate birthdate;
} TPerson;
In addition to the TDate struct from above, we define a struct for a name.
As a name typically consists of multiple parts, we define those parts as separate members.
In our case, we want to store up to three first names, each of which can be up to 20 characters long, and a last name which can be up to 40 characters long.
You can see that we can also use two-dimensional arrays as members.
Finally, we define a struct TPerson with two members name and birthdate.
For those members we can simply use the new types that we defined immediately above.
If we define a variable TPerson p1, we can imagine the following memory structure to be reserved:

To access the members of p1, we have to use multiple dots now, e.g.:
int main() {
    TPerson p1;
    ...
    puts(p1.name.firstname[0]); // prints the first firstname
    ...
    p1.birthdate.day = 13;  // changes the person's birthday
    p1.birthdate.year = 1999;
    ...
}|
Again, accessing structs as a whole makes no sense. For example |
While the picture above provides a good explanation on how to access a person’s members, the memory layout is a little bit different. Again, all members are stored next to each other in memory, so the memory layout would look more like that:

So there is actually no additional memory needed for TName name and TDate birthdate other than for their members.
Knowing that, we can also calculate the size of a TPerson variable:
-
char firstname[3][21]: 63 bytes -
char lastname[41]: 41 bytes -
char day: 1 byte -
char month[4]: 4 bytes -
int year: 4 bytes
Total: 113 bytes. You can also check that using your compiler:
... // struct definitions from above
int main() {
    printf("%d", sizeof(TPerson));  // 113
}
As mentioned, depending on your compiler, this may print a number larger than 113 if the compiler decides to stuff a few additional bytes between your members to make the start addresses multiples of 8/16/32/64/…
As a shorthand for the two notations from above, from here on we will draw nested structures like that:

We can also use the anonymous struct declaration syntax to define the TPerson struct in one declaration:
typedef struct {
    struct {
        char firstname[3][21];
        char lastname[41];
    } name;
    struct {
        char day;
        char month[4];
        int year;
    } birthdate;
} TPerson;
In this case, the structures for the name and birthdate are not defined separately and thus cannot be used in other definitions.
|
Do not forget that in |
3.1.3. Struct Assignment
You are allowed to copy struct variables using the assignment operator:
int main() {
    TPerson p1, p2;
    p1.birthdate.day = 30;
    ...
    p2 = p1;
    printf("%hhu", p2.birthdate.day); // will print 30
}
For p2 = p1, the compiler will basically insert a memcpy(&p2, &p1, sizeof(TPerson)).
That means, p2 will be a byte-by-byte copy of p1.
|
Comparing struct variables using |
3.1.4. Passing Structs to Functions
Passing a struct variable to a function works like passing a primitive data type variable. Since the compiler knows how to copy a struct (see Struct Assignment), the variable is passed by value, that means, the function receives a copy of it. Also, for the same reason, a struct can be used as a return value, as seen in the following example:
typedef struct {
    char day;
    char month[4];
    int year;
} TDate;

TDate readDate();
void printDate(TDate d);

int main(void){
    TDate d = readDate();
    printDate(d);
    return 0;
}

TDate readDate() {
    TDate d;
    printf("Day: ");
    scanf("%hhu", &d.day);
    printf("Month: ");
    fflush(stdin);
    fgets(d.month, 4, stdin);
    printf("Year: ");
    scanf("%d", &d.year);
    return d;
}

void printDate(TDate d) {
    printf("%hhu-%s-%d\n", d.day, d.month, d.year);
}|
Passing large structs to functions involves copying a lot of data!
Do not pass large structs using call-by-value, because copying large amounts of data is slow and unnecessary in most cases. Use input/output parameters instead! |
Example for using structs as input/output parameters:
void upCaseMonth(TDate* d); (1)

int main(void){
    TDate d = readDate();
    upCaseMonth(&d); (2)
    printDate(d);
    return 0;
}

void upCaseMonth(TDate* d) {
    int i = 0;
    while((*d).month[i]) {  (3)
        (*d).month[i] = toupper((*d).month[i]);
        i++;
    }
}| 1 | The parameter d of upCaseMonth is an input/output parameter.
As usual, we need to write a * sign in front of the variable name in the parameter list.
This means that the function does not receive a copy of the total struct, but just its address.
So d is an address in this function. |
| 2 | Consequently, we need to pass the address of our struct variable when we call upCaseMonth.
Therefore, we write the address-of operator (&) in front of the variable name. |
| 3 | In the function itself, we need to dereference d before accessing it.
Note that the member access operator (.) has a higher priority than the dereference operator (*) according to the operator precedence table.
Therefore, we need to write (*d).month (dereference d and then select month) instead of *d.month (select month in an address and then dereference it — makes no sense). |
|
Always use |
|
When using a member from an input/output parameter for scanf, do not forget the additional
|
Shorthand for Member Access on Pointers
Typing (*x).y is cumbersome but necessary very often.
Therefore, there is a shorthand "arrow operator" (officially also called member access operator):
|
|
The left hand side of the -> operator is not interpreted as a structure, but as the address of a structure.
The upCaseMonth function from above could be rewritten as follows:
void upCaseMonth(TDate* d) {
    int i = 0;
    while(d->month[i]) {
        d->month[i] = toupper(d->month[i]);
        i++;
    }
}
Of course, this operator can also be used with scanf:
scanf("%d", &ioparam->member)
3.1.5. Initializing Structs
Initializing each member of a struct individually results in a lot of typing work:
int main() {
    TDate d1;
    d1.day = 13;
    strcpy(d1.month,"JAN");
    d1.year = 2000;
    ...
}
Just as you can initialize arrays using the curly brace syntax, you can also initialize structs with it:
TDate d1 = {13, "JAN", 2000};This is much shorter and more convenient as you can use string initializers like "JAN" as well.
|
Members must be initialized in the same order as they are defined in the structure! |
When initializing nested structures, use nested groups of curly braces:
TPerson p1 = {{{"Alice", "May"}, "Howard"}, {15, "MAY", 1972}};Each group of braces initializes one member.
TPerson p1 = {
    {                       // name member
        {"Alice", "May"},   // firstname array
        "Howard"
    },
    {15, "MAY", 1972}       // birthdate member
};
If you are very careful and specify values for all members (and in this case, values for all array elements), you can leave out the nested braces:
TPerson p1 = {"Alice", "May", "", "Howard", 15, "MAY", 1972};|
Avoid that syntax — it does not make your program better or faster! Rather be more clear about what you initialize. |
If you do not want to initialize all members or you want to initialize them in a different order, you can use the label-based syntax variant:
TPerson p1 = {
    .birthdate = {15, "MAY", 1972},
    .name = {{"Alice", "May"}, "Howard"}
};

TPerson p2 = {.birthdate = {17, "JUN", 1990}};
Explanation from a compiler manual:
In a structure initializer, specify the name of a field to initialize with '.fieldname =' before the element value. For example, given the following structure,
struct point { int x, y; };the following initialization
struct point p = { .y = yvalue, .x = xvalue };is equivalent to
struct point p = { xvalue, yvalue };
3.1.6. Structs as Array Elements
Of course, you can define an array of variables that are structs.
Example:
int main() {
    TPerson clazz[30]; (1)
    int i;
    for(i = 0; i < 30; i++) {
        fgets(clazz[i].name.firstname[0],21,stdin); (2)
        fgets(clazz[i].name.lastname,41,stdin);
        scanf("%hhu", &clazz[i].birthdate.day); (3)
        fgets(clazz[i].birthdate.month);
        scanf("%", &clazz[i].birthdate.year);
    }
}| 1 | clazz is an array of 30 TPerson objects. (Note: class is a reserved keyword in most compilers that also know C++). |
| 2 | When accessing the array, do not forget to add an array index like [i] to first address one of the 30 array elements. Afterwards, continue with the dot syntax to access the structure’s members like name. |
| 3 | Do not forget to use the address-of operator when passing an integer variable like day to scanf! |
In memory, you can imagine clazz like that:

In total, clazz would have 3390 bytes (113 bytes for one TPerson * 30 array elements).
3.2. Unions
Unions are special kinds of structs that mainly exist for historic reasons (to save memory). They are used whenever a variable needs to store different information during the runtime of a program, but not at the same time.
3.2.1. Declaration and Usage
Unions are declared and used the same way as structs but using the keyword union.
Example: (using the typedef syntax variant)
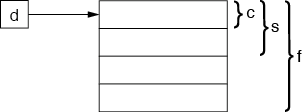
typedef union {
    char c;
    short s;
    float f;
} TData;

int main() {
    TData d;
}
In memory, this struct only needs 4 bytes: (assuming that short is 2 bytes and float is 4 bytes long)
| The reason is that all three members start at the same address. |
In contrast to that, defining the same three members in a struct would result in the following: (reserving 7 bytes in total)
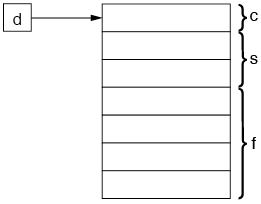
What happens if you access members of the union?
Writing to d.c overwrites the first byte of the union, writing to d.s the first two bytes and writing to d.f overwrites all four bytes of the union.
|
Writing one member of a union also overwrites data of all other members!
This means that only one member can be used at a time. |
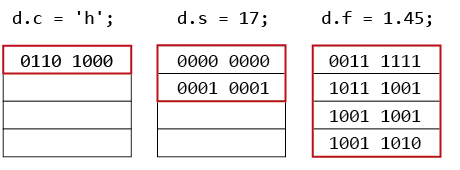
This is also demonstrated by the following program:
int main() {
    TData d;
	d.s = 1234;
	d.f = 1.45;
	printf("s = %hd", d.s); // prints s = -26214 (1)

	d.s = 17;
	d.c = 'h';
	printf("\ns = %d", d.s);	// prints s = 104 (2)

	d.f = 2.33;
	d.c = 'x';
	printf("\nf = %f", d.f);	// prints f = 2.329985 (3)
}| 1 | The first section shows that d.f = 1.45 wrote in the same memory region where d.s is stored, so printing d.s results in a different result (-26214 vs. the original 1234). |
| 2 | The same is the case when writing d.c, you overwrite the first byte of d.s as well, so the value is modified (corrupted). |
| 3 | The third example shows that, sometimes, the modification (probably a programming error) might not be so easy to see.
Here, overwriting the first byte of d.f by setting d.c = 'x' does not completely corrupt the float variable.
Due to the way floating point numbers are stored, the value is still approximately 2.33 and we just corrupted some of the bits responsible for the last few decimal digits. |
3.2.2. Using Unions Correctly
If we want to write useful programs dealing with unions, we need to find a way to store which member is currently used.
Why? Imagine a simple function to print the data stored in a union:
void printData(TData dat) {
    printf("%c", dat.c);
    // printf("%hd", dat.s);
    // printf("%f", dat.f);
}
Without any additional information, the function has no chance to know which of the three printf statements should be used to print the data.
Note that all three variants would compile perfectly, but depending on which union member was written to before calling printData, two of them would print garbage.
The solution to this problem is to use a combination of a struct and a (nested) union to create a data type that can store this additional information as well.
typedef struct {
    int type;
    union {
        char c;
        short s;
        float f;
    } data;
} TData;
If we define TData this way, we can use the type member to store which of the union members has been used.
We use the following convention:
-
type= 1 →cwas used -
type= 2 →swas used -
type= 3 →fwas used
Whenever we store something in TData now, we also have to set type to the correct value:
TData dat;
dat.data.c = 'h';
dat.type = 1;
printData(dat);

dat.data.s = 47;
dat.type = 2;
printData(dat);

dat.data.f = 1.45;
dat.type = 3;
printData(dat);
Exercise: Write the function printData such that it correctly prints the value stored in the union in all cases.
|
| To make the program more readable, define constants for these three values and use those instead of the numbers. |
const int UTYPE_CHAR = 1;
const int UTYPE_SHORT = 2;
const int UTYPE_FLOAT = 3;
...
TData dat;
dat.data.c = 'h';
dat.type = UTYPE_CHAR;
printData(dat);
3.3. Enumerations
3.3.1. Declaration and Usage
Considering the last example of a combined struct and union, using numbers (or constants) for the type member is not an optimal way.
int type; does not tell us which values are allowed for type if it’s not documented directly there.
What if someone accidentally changes the type to 4 (we used 1 to 3 for the three allowed types)?
It would be better if we could define a new type that has exactly three different values.
This is what enumerations are for.
|
Enumerations are used to define data types by enumerating (listing) all its values.
The values are represented by identifiers; internally they are stored as integers. |
Example:
typedef enum {
    CHAR,
    SHORT,
    FLOAT
} UnionType;
...
typedef struct {
    UnionType type;
    union {
        char c;
        short s;
        float f;
    } data;
} TData;
We define an enum called UnionType (again, types are named in CamelCase) that has three values: CHAR, SHORT, and FLOAT.[1]
We can use the new type wherever we want.
In this case, we replace the type member in our TData struct to be of type UnionType.
Instead of defining our own constants we can now use the values as "literals" of this type:
TData dat;
dat.type = CHAR; (1)
dat.data.c = 'h';
...
if(dat.type == FLOAT) {         // could be in a printData function
    printf("%f", dat.data.f);
}| 1 | Note that the values are NOT strings, so don’t write "CHAR" or something like this. |
| We named the values in all-upper-case, like constants — because that’s what they essentially are. |
As mentioned, the compiler assigns a number to each value (sometimes also called ordinal), starting from zero:
typedef enum { CHAR , SHORT , FLOAT } UnionType;
//              = 0 ,  = 1  ,  = 2
These ordinal numbers can be changed when declaring the enum:
typedef enum { CHAR = 47, SHORT = 22, FLOAT = 100 } UnionType;You can see that the numbers are not necessarily consecutive, but can be arbitrary. Sometimes, this can be handy if you want to use the ordinal in another way, for example:
typedef enum {
    AUT = 43,
    GER = 49,
    ITA = 39
    // ...
} CountryCallingCode;

CountryCallingCode c = AUT;
This enum of telephone calling codes for different countries uses the ordinal number to store the actual calling code for each country.
You can then use printf("%d", c) to print this code.
|
Arithmetic Operations on Enums might work different than you expect!
If you call |
3.3.2. Example: Boolean Type
Enumerations could be used to define a Boolean data type very easily (if it were not available in stdbool.h already):
typedef enum { FALSE, TRUE } TBool;

TBool somebool = FALSE;
In this case FALSE would automatically be assigned to 0 and TRUE to 1, so you could still use it in conditions like if(somebool) { … }.
4. Pointers
I do consider assignment statements and pointer variables to be among computer science’s most valuable treasures.
Structured Programming with go to Statements (Computing Surveys 6 (5): 261–301; 1974)
This quote from Donald Knuth, a very well-respected computer scientist, author of “The Art of Computer Programming”, the definitive book on computer algorithms and their analysis, already shows the importance of pointers.
You should have learned about pointers already when talking about input/output parameters of functions. Maybe you didn’t call it pointers, but that’s what input/output parameters actually are. Besides input/output parameters, many other uses of pointers are available in C, which we will discuss in the following section.
4.1. What is a Pointer?
Before we start, let’s recap again what a pointer is.
In computer science, a pointer is a programming language object, whose value refers to (or "points to") another value stored elsewhere in the computer memory using its memory address.
https://en.wikipedia.org/wiki/Pointer_(computer_programming)
In C we define pointers using the asterisk (*) syntax as follows:
int *p;Of course, like any other variable, p has no value yet.
We can make it point to another value using the address-of (&) operator:
int x = 5;
p = &x;
We have declared two variables called p and x, where x holds a value and p holds the address of x.

|
Remember that memory cells are numbered (and we call those numbers addresses).
So in this case, assume that |
We can now access the value 5 in two ways:
printf("%d", x);       // prints 5
printf("%d", *p);      // prints 5
The first line directly uses x — nothing new.
The second line, however, uses our new pointer variable p.
But to print the value of the variable the pointer points to, we have to dereference it, using the dereference operator * (just as you did it with input/output parameters).
If we do not write the dereference operator, we would just print the value stored in p directly, which is 0x228 (or, rather its decimal value 552 instead).
Of course, neither we nor a user can use this information in any way.
Note that if you test this program on your computer, the memory addresses will vary, of course.
|
Analogies of Pointers
If you have a hard time understanding what a pointer is, try the following analogies:
|
4.1.1. Declaring Pointers
Pointer variables can be declared using the syntax
basetype * variablename;
where basetype can be any other data type.
Examples:
int x = 5;
int *px = &x;

char c = 'h';
char *pc = &c;

double d = 7.45;
double *pd = &d;
The convention used here is that px stands for “pointer to x”.
How much memory do px, pc and pd need?
Does a pointer to a double variable need more memory than a pointer to an integer variable?
No, each pointer needs exactly the same amount of memory that depends on your computer architecture.
|
If you have a 32-bit processor, a pointer will occupy 32 bits or 4 bytes. If you have a 64 bit computer, it will occupy 64 bits or 8 bytes. |
4.1.2. Setting, Changing and Dereferencing Pointers
Throughout the program’s lifetime, the value of a pointer variable can change. You can simply use the assignment operator to assign the pointer a new value (a new address).
int x = 4, y = 5;
int *p;

p = &x; (1)
printf("%d", *p);
p = &y; (2)
printf("%d", *p);| 1 | After this instruction, p stores the address of x.
So the next line prints 4. |
| 2 | After this instruction, p stores the address of y.
So the next line prints 5. |
4.1.3. The NULL Pointer
The address 0 is defined to be invalid.
Therefore, if a pointer variable has the value 0, it does not point to a valid object.
This value is often used to show that a pointer is uninitialized or no longer used.
The file stdlib.h defines a constant called NULL with the value 0 for that.
That’s why pointers with the value 0 are also called null pointers.
int *p = 0;
int *q = NULL;| If you try to dereference a null pointer, your program will crash! |
4.1.4. The Dereference Operator
The dereference operator * is necessary to access the actual content of the variable a pointer points to.
It is a unary operator and needs only one operand (unlike the multiplication operator *, which needs two operands).
The dereference operator can be used both on the left and right hand side of an assignment:
float a;        (1)
float b;        // or: float a, b, *pa;
float *pa;      // or: float *pa, a, b;
pa = &a;         (2)
*pa = 12;        (3)
*pa += 5.5;      (4)
b = *pa + 5; (5)| 1 | Two float variables a and b and a pointer to a float (pa) are declared.
These declarations could be combined into one using the following syntax:
float a, b, *pa.
Note that the asterisk must be written in front of each variable that should be declared as a pointer.
float *pa, a, b would not declare three pointers, but just a pointer pa and two floats a and b. |
| 2 | pa now points to a. |
| 3 | The value of the variable where pa points to, is assigned the new value 12.
This actually changes a (due to the previous line). |
| 4 | The value of the variable where pa points to (so a) is increased by 5.5.
So a is now 17.5. |
| 5 | b is assigned the value of the variable where pa points to (which is a having the value 17.5) plus 5, so b gets 22.5. |
4.2. Pointers vs Arrays
You know that the name of an array is “the address of the first array element” and you know that we often write character arrays as char *.
So as you maybe guessed, an array is a pointer — or at least you can handle it that way.
But: it is a constant pointer, so you cannot modify the pointer (the base address) itself.
Example:
int a[4] = {1,2,3,4};
printf("%d", *a);   (1)
*(a+2) = 9;         (2)

// invalid: a = a + 2; (3)| 1 | Dereferencing the array accesses the first element. |
| 2 | You can add two elements to a and access the resulting address by dereferencing it. |
| 3 | Modifying a itself is not allowed, you would lose the start address of your array. |
Of course, you can create additional pointers that point to the same memory location as an array. Such a pointer can also be modified:
int a[4] = {1,2,3,4};
int *pa = NULL;

pa = a;     // or: pa = &a[0]; (1)
*pa = 11;   // or: pa[0] = 11; (2)

pa = a + 2  // or: pa = &a[2]; (3)
if(pa[1] == 4){ // or: if(*(pa + 1) == 4)  (4)
    ...
}| 1 | The pointer pa now also points to the first element of a, as we copied its start address. |
| 2 | By dereferencing pa we write to the first element. |
| 3 | You can treat a as a pointer and add two elements (not bytes) to it and save the resulting address to pa. |
| 4 | You can see that the pointer pa can be treated as an array as well. |
4.3. Pointer Arithmetic
You have already seen that we can calculate with pointers (addresses), e.g. go two elements further from an address p using p + 2.
However, there are more operations which can be done using pointers.
-
You can assign pointers to other pointers of the same type. If the type does not match, the compiler will throw an error.
int x=5, *p1, *p2; p1 = &x; p2 = p1; // the address in p1 is copied to p2 -
Pointers that are unused should be assigned the value NULL.
-
You can increment and decrement pointers. However, be aware that the step size is not 1 byte but the size of the base type of the pointer. For example, incrementing an
int *by one will move it further by 4 bytes (if your int has 4 bytes).int x[] = {1,2,3,4}; int *p = x; printf("%d,", *p); // prints 1 p++; printf("%d,", *p); // prints 2 p--; printf("%d,", *p); // prints 1p++will movepto the next array element,p--to the previous. You have to be careful not to move your pointer outside of a valid memory region. Trying to dereference an address not belonging to your program will crash it (if you’re lucky). -
You can compare pointers using
==,>,<,>=,<=and!=if they have the same type. Comparing a pointer with NULL is also allowed.Since pointers are just addresses, a comparison will compare those addresses as usual. It allows you to check which pointer points to a higher memory location.
int x[] = {1,2,3,4}, *p = x, *q = x + 1;
if(p < q) {
    printf("q points to a higher memory location than p");
}
-
You can add and subtract integers to pointers. In the same way as incrementing and decrementing, this adds or subtracts a given number of elements from a pointer.
int x[] = {1,2,3,4}, *p = x; p += 2; // p now points to 3 -
You can subtract pointers from each other if they have the same type. The result is an integer describing the distance in elements of the base type.
int x[] = {1,2,3,4}, *p = x, *q = x + 2; printf("%d", q - x); // prints 2 -
Adding pointers does not make sense and is therefore not allowed.
|
Be aware of operator priorities!
The dereference operator Therefore, *pv++ and *pv-- are equivalent to *(pv++) and *(pv--) — the |
4.4. Pointers and Structs
A pointer can point to any variable, therefore also to a struct.
typedef struct {
    int num;
    int denom;
} Fraction;
...
Fraction f;
Fraction *pf = &f;

f.num = 5;
// or:
(*pf).num = 5;
// or:
pf->num = 5;
Exactly like in the case where we use structs as input/output parameters, we have to use the (*pf).num syntax to first dereferences the address in pf and then access one of its members.
As we know, pf->num is a shorthand syntax for that.
Very often, structs are accessed using pointers to avoid copying them and therefore a new type is defined:
typedef Fraction* PFraction;

// or directly on the declaration:
typedef struct {
    int num;
    int denom;
} Fraction, *PFraction;
...

Fraction f;
PFraction pf = &f;
pf->num = 5;
4.5. Pointers and Strings
A string is an array of characters, an array is (similar to) a (constant) pointer. So there are two ways to define strings:
char text[] = "Hello World";
char *text2 = "Hello World";
Lets discuss each of them in detail.
-
char text[] = "Hello World";declares an array of 12 characters (don’t forget the'\0') and fills it with the characters'H','e', …, up to'\0'. That means thattextis constant (you cannot modify it) and therefore you cannot do things liketext = "Foo bar"; // compiler error!Instead, you would have to use something like
strcpy(text, "Foo bar").Why does the latter work?
What is"Foo bar"actually?
It’s a string constant, which is stored in the data section of your program (neither on the stack nor on the heap). The compiler creates such a string constant for every string literal ("…") it sees in your program. That’s why you can copy each character from"Foo bar"to your stringtextusingstrcpy. But you cannot changetextto point to the memory location of"Foo bar"becausetextis a constant and cannot be changed.Of course, however, you can change the contents of
text:text[0] = 'X'; -
The situation is different, however, for
char *text2 = "Hello World";.textis now a pointer and it points to the memory location of the string constant"Hello World"in the data segment.Therefore, you cannot modify the contents of
text, because your operating system probably does not allow you to modify the contents of your program.text2[0] = 'Y'; // crashes your programHowever, you can change the value of
textitself and let it point to a different string constant:text2 = "Foo bar"; // works!
4.6. Pointers as Return Values
Like any other data type, pointers can also be used as the return type of a function:
type *functionname(... arguments ...) {
    ....
}
Examples:
-
A function that returns a pointer to the
'\0'character of a string:char *asciinull(char *s) { return s + strlen(s); } -
A function that returns a pointer to the first occurrence of a given character in a string:
char *findChar(char* s, char c) {
    while(*s) {
        if(*s == c) {
            return s;
        }
        s++;
    }
    return NULL;
}
|
Do not return pointers to local variables from functions!
Local variables (declared inside a function) do not exist after the function has finished. Returning a pointer to such a variable leads to a crash! Solutions to that problem will be discussed in the following chapter. |
4.7. Pointers to Pointers
A pointer p can point to any other location in memory and you can access the content of that memory location using *p:

What if a pointer points to a memory location which is a pointer itself
(that means, the location where p points to is an address again)?
Of course this is possible, since a pointer can be made from any other data type, including pointers.
int x = 42;
int *p, **pp;
p = &x;
pp = &p;
The variable int **pp is now a pointer to a pointer to an integer.

You can now access the value of x in three different ways:
printf("%d", x);    // prints 42
printf("%d", *p);   // prints 42
printf("%d", **pp); // prints 42
Obviously, this can be repeated infinitely, so you can even define a pointer to a pointer to a pointer to … something.
Example
int i, *p, **pp, ***ppp; i=100;
ppp=&pp;
pp=&p;
p=&i;
You always have to keep in mind what is stored in each variable.
What are the following expressions?
-
*pppis the content ofpp, which is an address -
**pppis the content ofp, which is still an address -
***pppis the content ofi, the value 100. -
*ppis the content ofp, an address -
**ppis the content ofi, 100. -
*pis also the content ofi.
You can see that it gets complicated once multiple levels of pointers are involved and things can go wrong very easily. Nevertheless, sometimes pointers to pointers are needed for building efficient data structures as we will see in the following chapters.
4.8. Pointer Arrays
Pointers are a very good way to build efficient data structures and algorithms. For example, when sorting a list of strings, it is faster not to swap the whole content of two strings but use a list of pointers to those strings and swap them instead.
Whenever we use a number of pointers, we can keep them in an array, which we call pointer array.
Example:
int x[] = {1,2,3,4,5,6,7,8,9,10};
int *pa[4];
pa[0] = x;
pa[1] = x + 4;
pa[2] = x + 1;
pa[3] = x + 7;
pa is an array of four pointer to integers.
Each element of the array then points to an element of x.

|
The website cdecl.org helps you understand C data type declarations by spelling them out.
For example, if you type in declare pa as array 4 of pointer to int which means |
Pointer arrays are more useful with strings:
char *strptr[5] = {"Bob", "Alice", "Jim", "Tom", "Jeff"};
Let’s see how we can access different parts of this array:
-
*strptr==strptr[0]is a pointer to the first string in the array (Bob), i.e., the address of the letter "B". -
**strptr==*strptr[0]is the first letter of Bob, "B" (a value) -
*(strptr+3)==strptr[3]is a pointer to the fourth string in the array (Tom), the address of the letter "T". -
*(strptr+i)==strptr[i]pointer to the ith string (an address) -
**(strptr+i)==*strptr[i]= first character of the ith string (a value) -
*(*(strptr+1)+2)==*(strptr[1]+2)3rd character in the 2nd string (the letter "i" from Alice) -
*(*(strptr+i)+j)==*(strptr[i]+j)==strptr[i][j]: character with indexjin string with indexi
You can test those easily using some printf commands. Remember that you have to pass a character to printf for a %c, but an address for a %s.
printf("%c\n", *strptr[1]); 		// A
printf("%s\n", strptr[2]); 			// Jim
printf("%s\n", *(strptr+3)); 		// Tom
printf("%c\n", *(strptr[3]+2)); 	// m
printf("%s\n", strptr[2]+1); 		// im
printf("%c\n", *(*(strptr+1)+3)); 	// c
Of course, you can easily change strings in this array using an assignment:
strptr[1] = "John";
The string constant "Alice" is no longer needed and strptr[1] now points to "John".
4.8.1. Example: Reading Strings into a Pointer Array
Note that if you want to read in strings from the user and store them in a pointer array, you need some memory to store the strings!
You cannot simply pass strptr[0] to scanf or gets, because it will not point to a writable address.
So you need to define a second character array like in the following example.
int main() {
    char lst[MAXR][MAXC]; (1)
    char *strptr[MAXR]; (2)

    for(i = 0; i < MAXR; i++) {
        fgets(lst[i], MAXC, stdin)); (3)
        strptr[i] = lst[i]; (4)
    }
    for(i = 0; i < MAXR; i++) {
        puts(strptr[i]);
    }
}| 1 | We declare a two-dimensional character array with MAXR rows and MAXC columns to store the actual strings. |
| 2 | Next we declare an array of MAXR string pointers |
| 3 | We read a string into our lst array |
| 4 | strptr[i] points to row i in lst |

5. Dynamic Memory Management
A big disadvantage of managing data using arrays was that we had to define the array size at compile time. However, for most programs it’s not possible to tell at compile time how much data will be processed. This information is available at run-time only. The following commands will allow us to allocate (acquire) as much memory as we need at compile-time using the so-called heap space.
The heap space is a distinct memory region in your program:

While local variables are automatically placed in the stack space, we can manually obtain memory segments on the heap using special functions from stdlib.h.
The lifetime of these segments is not coupled to the lifetime of any function, so we have to take care of releasing them manually if they are not used any longer.
5.1. Allocating Memory
To allocate memory on the heap, you can use one of two functions: malloc or calloc.
They work mostly the same with only small differences.
To enlarge or shrink a previously allocated memory region, there is realloc.
5.1.1. malloc
The prototype of malloc is:
void *malloc(unsigned int size);Calling malloc reserves size number of bytes on the heap and returns a pointer to that memory region.
The result pointer has no type (void *), because we want to use the result for different variables.
You have to cast the pointer explicitly to the pointer type you want.
Example: Dynamically allocating space for an integer array with 80 bytes.
int *x;
x = (int*) malloc(20*sizeof(int)); (1)| 1 | Note the explicit type cast using (int*).
The types on both sides of the assignment need to be equal.
Therefore, we tell the compiler to interpret the void pointer as an int pointer. |
|
Rule of Thumb
Look at the type of the variable on the left hand side of the assignment (in this case |
x now points to a memory region that is (at least) 80 bytes (assuming your int is 4 bytes), which corresponds to an array with 20 elements.
It is good practice to always use sizeof(basetype) to dynamically calculate the size of the memory region depending on the size of one of the elements that you want to store.
|
Uninitialized Data!
The content of the allocated memory is not initialized, just like a local variable. |
|
Check on NULL
There might be the unlikely case that Otherwise your program will crash on dereferencing |
Example
#include<stdio.h>
#include<stdlib.h>
int main() {
    int i, n, *ptr, *help;
    printf("How many integers would you like to enter? ");
    scanf("%d", &n); // assume n = 3
    ptr = (int *) malloc(n * sizeof(int));
    if(ptr == NULL) {
        printf("Memory Allocation Error... Exiting!\n");
        return 0;
    }
    printf("Memory allocated successfully!\n", n * sizeof(int));
    help = ptr;
    for (i = 0; i < n; i++, help++) {
        printf("Reading to address %X: ", help);
        scanf("%d", help); // e.g., enter 10, 20, 30
        //or: scanf("%d", &ptr[i])
    }
    help = ptr;
    printf("\nThe memory content is: ");
    for (i = 0; i < n; i++, help++) {
           printf("%d ", *help); // would print 10 20 30
    }
}
Note that we use a second pointer help to iterate through the array elements.
The reason is that you should never lose the base pointer of your dynamic memory segment, because you need to release it when it is no longer needed (see Releasing Memory below).
Output:
How many integers would you like to enter? 3
Memory allocated successfully!
Reading to address 1101030: 10
Reading to address 1101034: 20
Reading to address 1101038: 30

The memory content is: 10 20 30
5.1.2. calloc
void *calloc(unsigned int n, unsigned int size);calloc reserves memory for n data objects of size bytes each, that means n * size bytes and initializes the memory with zeros.
It returns NULL if there is an error during the allocation, otherwise a void pointer to the allocated memory region.
So the 80 bytes integer array from above can also be allocated using
int *x = (int*) calloc(20, sizeof(int));
if(x == NULL) {
    printf("Memory allocation error!");
    return 0;
}|
Is it better to use calloc instead of malloc?
Mostly, no. The reason is, that you should initialize memory regions anyway before you use them. So the only situation where calloc makes more sense than malloc is, if you initialize the whole region to |
5.1.3. realloc
Sometimes, it is not even possible to know how much memory will be needed eventually at the beginning of the program. Using realloc you can re-allocate memory and change its size without losing the content.
void *realloc(void *ptr, unsigned int size);realloc changes the size of the dynamically allocated(!) memory region in ptr to be size bytes.
Any data in the region 0…min(oldsize, newsize) will be preserved.
So if you enlarge the segment, the old data will still be there, the added bytes will be uninitialized.
If you shrink the segment, bytes which are no longer part of the segment will be released and all other data will remain untouched.
|
The segment may be moved during realloc!
Be aware that realloc can move your memory segment if there is not enough contiguous memory available after the old segment. While your data will be copied over, any pointers that you may hold to the previous memory segment will be invalid! |
|
The realloc may fail too!
If the function fails to allocate the requested block of memory, a null pointer is returned, and the memory block pointed to by |
Example:
int *x = (int*) malloc(20 * sizeof(int));
// do something with x ...
// we notice that 20 elements is not enough,
// e.g., user enters more than 20 values
int *y = (int*) realloc(x, 40 * sizeof(int));
if(y == NULL) {
    printf("Memory Allocation Error!");
    // ...
    return 0;
}
x = y;
// continue working with x
5.2. Releasing Memory
void free(void * ptr);free releases memory that was allocated using malloc, calloc or realloc (never call free with a pointer to anything else!).
You must pass a pointer to the beginning of the memory using ptr (that’s the reason why you should never lose the base pointer of your dynamic memory regions!).
If you pass NULL, nothing happens.
|
Always release the memory that you allocated!
If you do not |
Example:
int main() {
    int *x;
    int n; int i;
    scanf("%d", &n);
    x = (int*) malloc(n * sizeof(int));
    for (i = 0; i < n; i++) {
      x[i]=0;
    }
    free(x);
}
6. Linked Lists
A big disadvantage of arrays is that inserting and deleting elements at the beginning or in the middle of the array involves moving all the following array elements in memory. If this is a very common operation, there exists a better data structure to store the elements — a so-called linked list.
There are two popular concepts of linked lists:
-
singly-linked lists, and
-
doubly-linked lists.
6.1. Singly-Linked Lists
In a list, each data element is stored in a so-called node. In addition to the actual data stored, a node contains meta-data. In the case of a singly-linked list, this is a reference (pointer) to the successor node (the next node in the list).

The list itself is just a reference (pointer) to the first element in the list.
In C, we can define a node using a struct:
typedef struct Node {
    struct Node* next;
    int data;
} TNode, *PNode;
To store the list depicted above, we can create the following nodes.
PNode list, n0, n1, n2;
n0 = (PNode) malloc(sizeof(TNode));
n1 = (PNode) malloc(sizeof(TNode));
n2 = (PNode) malloc(sizeof(TNode));
list = n0;
n0->data = 3;
n0->next = n1;
n1->data = 4;
n1->next = n2;
n2->data = 5;
n2->next = NULL;
The nodes are created using malloc in the heap, such that the list’s lifetime is independent from functions.
The next pointer of the last element is NULL, thus indicating the end of the list.
6.1.1. Iterating Through a List
Going through all elements of the list (e.g., for printing the list’s content) is a matter of a simple loop:
PNode n = list;
while(n) {
	printf("%d, ", n->data);
	n = n->next;
}
We use a PNode variable n to iterate through the list, starting at the first node in the list.
In each loop iteration we print the data value of the current element and then move on to the next list element by “switching” to the next element (replacing n by n->next).
Eventually, n will be NULL because the next pointer of the last node is NULL and the loop will terminate.
6.1.2. Inserting a Node at the Beginning
Inserting a new node as the first node in the list is easy, because we know the first element (list).

PNode newn = (PNode) malloc(sizeof(TNode));
newn->data = 2;
newn->next = list;
list = newn;
The pointer list now points to the new node, whose next pointer points to n0.
6.1.3. Inserting a Node at the End
In order to insert a node at the end, we must first obtain a pointer to the last node (exercise: how can you do that if you have just a pointer to the beginning?).
Then the new node is inserted as the successor of the former last node.
The next pointer of the new node now points to NULL.

PNode last = n2;
PNode newn2 = (PNode) malloc(sizeof(TNode));
newn2->data = 6;
newn2->next = NULL;
last->next = newn2;
6.1.4. Inserting a Node in the Middle
In order to insert a node between two existing nodes, we need a pointer to the left one.
For example, when inserting between n1 and n2, we need a pointer to n1.

PNode previous = n1;
PNode newn3 = (PNode) malloc(sizeof(TNode));
newn3->data = 10;
newn3->next = previous->next;
previous->next = newn3;
6.1.5. List Handling Functions
Of course it makes sense to encapsulate such list operations in functions.
For example, generating a node:
PNode createNode(int value, PNode next) {
    PNode n = (PNode) malloc(sizeof(TNode));
    n->data = value;
    n->next = next;
    return n;
}
Printing a list:
void printList(PNode list) {
    while(list) {
        printf("%d, ", list->data);
        list = list->next;
    }
}
Inserting a new value at the beginning:
void insertFront(PNode *list, int value) {
    PNode newn = createNode(value, *list);
    *list = newn;
}
Question: Why do we need a PNode* argument in this case?
|
Exercise
Write the remaining functions to insert nodes at the end/middle and delete nodes. Be careful to think of all the different cases, e.g., it should be possible to insert a node at the “end” of an empty list, too! |
6.1.6. Advantages and Disadvantages of Singly Linked Lists
Are singly linked list better than arrays? Well, not always. We have seen that when inserting and deleting elements, we do not need to move other elements in memory. However, find a specific element (by value or by index), involves iterating over the list.
For example, getting the value at index 900 in a list with 1000 elements. Because only the lists begin is stored, we need to loop over 900 elements in order to find its value.
|
Arrays vs. Lists
|
So overall, there is no “better” data structure of these two — which one to use depends on the specific use case.
However, we can improve the performance of singly linked lists in some ways.
Question: How could we improve inserting elements at the end of the list?
6.2. Doubly-Linked Lists
One problem of singly linked lists is that there is no efficient way of iterating them in reverse order (from back to front).
The concept of a doubly linked list extends each node by a second pointer that references the previous element in the list. This allows us to navigate the list in both directions.
Example:

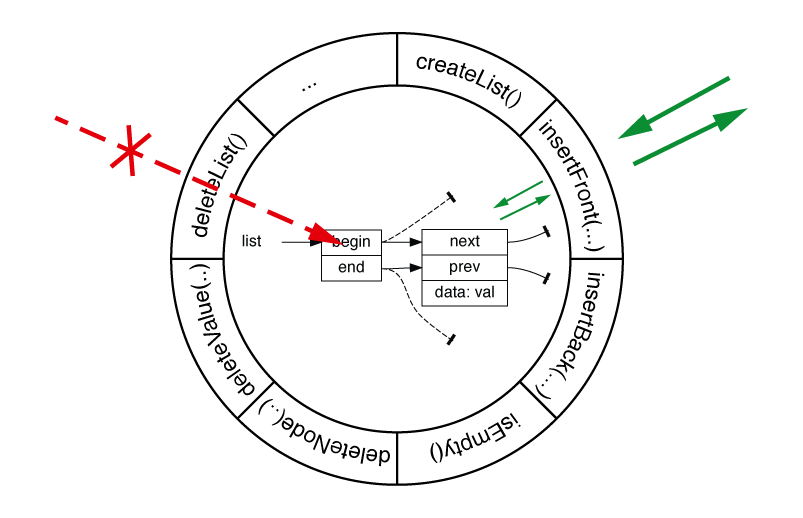
In this case, the list itself now consists of two pointers, one pointing to the first node (begin) and one pointing the last node (end, in order to start iterating from the end).
Similarly to the singly linked list, the next pointer of the last node is NULL, as well as the prev pointer of the first node.
We therefore define the list as a separate struct:
typedef struct Node {
    struct Node *next;
    struct Node *prev;
    int data;
} TNode, *PNode;

typedef struct {
    PNode begin;
    PNode end;
} TList, *PList;
Again, we define functions to create a (new, empty) list and a node with a given data value as well as prev and next pointers.
PList createList() {
    PList list = (PList) malloc(sizeof(TList));
	if(!list) {
		printf("Error allocating memory!");
		return NULL;
	}
	list->begin = NULL;
	list->end = NULL;
	return list;
}

PNode createNode(int data, PNode next, PNode prev) {
    PNode node = (PNode) malloc(sizeof(TNode));
    if(!node) {
        printf("Error allocating memory!");
		return NULL;
	}
    node->data = data;
    node->next = next;
    node->prev = prev;
    return node;
}
6.2.1. Inserting a Node at the Beginning
For doubly linked lists, operations are typically a bit more complex because we have to distinguish different cases.
For example, inserting a new node at the beginning of a list should be possible for empty and non-empty lists.
-
If the list was empty, its
endpointer has to be set to the new node.

-
If the list was non-empty, the
prevpointer of the first node has to be changed.

void insertFront(PList list, int val) {
    PNode n = createNode(val, list->begin, NULL);
    if(list->begin == NULL) {
        list->end = n;
    } else {
        list->begin->prev = n;
    }
    list->begin = n;
}
6.2.2. Printing a List
Printing a list from the beginning is mostly the same as with a singly linked list.
void printList(PList list) {
    PNode n = list->begin;
    while(n) {
        printf("%d, ", n->data);
        n = n->next;
    }
}
6.2.3. Other List Operations
The remaining list operations such as
-
adding a node at the end,
-
adding a node before or after a given node,
-
removing a given node,
-
removing a given value,
-
finding a node with a given value,
-
deleting all nodes with a given value
-
…
are left as an exercise.
7. Abstract Data Types
7.1. Information Hiding
Letting a “user” of a certain data type access and modify its “internal” structure might not be a good choice.
What if, for example, you decide to store the pointers in a list node of a doubly linked as an array instead of two separate pointers? (that does not really make sense but let’s just assume it).
Now if a user of your list has been accessing ->next and ->prev directly, the source code must be changed.
It would be better if such “internal” changes would not require changes in the “user code”, i.e., code that just uses a data type.
That’s why David Lorge Parnas[3] introduced the concept of Information Hiding.
|
The principle of information hiding states that a data type’s concrete implementation should be hidden from the user (i.e. code that just uses the data type, sometimes also called client code). Client code only has an abstract view of the data in the data type and accesses the data through function. |
7.2. Properties of an Abstract Data Type
A data type describes attributes and behavior of an object. An abstract data type (ADT) is a data type where the internal representation is hidden from the user (abstraction means “removing the details”).
An ADT has the following properties:
-
It defines a data type by its attributes, e.g. a Bank Account has an account number, an account owner, a balance, …; an Article has a name, a price, an article number, … Using this data type we can create variables (in this case called “instances”) of this type.
-
It has operations (functions, also called “methods”) to work with it. For example, modifying the data, printing the data, etc. These functions describe the behavior of the data type and are also called its interface.
-
The internal structure is hidden (information hiding) from the user, such that it can only be access using the functions (methods) defined above.
|
Advantages and Disadvantages of ADTs
Advantages:
Disadvantages:
|
7.3. Implementing an ADT in C
|
Declaration vs. Definition in C
In C, a declaration is a statement that introduces an identifier and describes its type, be it a variable, a function, or a type. A definition is a declaration that also allocates memory for the identifier. Example: When working with multiple files (compilation units), each file is compiled separately. Variables or functions defined in one file are not accessible in other files, unless declared appropriately. The Additionally, the Example: |
|
Header-Files and Source-Files
Typically, declarations will be placed in header files ( This way, functions (or global variables) can be used in multiple modules (files).
|
In order to implement the information hiding principle of an ADT in C we use the fact that one compilation unit (one .c file) cannot access elements of another unit unless they are imported using a header file.
We therefore define an ADT in a separate .c-file and place all functions (the ADT’s interface) in a .h-file such that the user can import it, while the implementation is hidden in the .c-file.
7.3.1. Example: Fraction
In the following, we implement an ADT representing a fraction. We create three files:
Fraction.h:
#pragma once (1)
typedef struct Fraction *PFraction; (2)

// Fraction Interface (3)
PFraction Fraction_create(int num, int denom);
int  Fraction_set(PFraction _this, int num, int denom);
int  Fraction_getNumerator(PFraction _this);
int  Fraction_getDenominator(PFraction _this);
void Fraction_show(PFraction _this);
PFraction Fraction_multiplyWith(PFraction _this, PFraction f);
void Fraction_delete(PFraction _this);| 1 | This preprocessor directive declares that this header file should be included at most once for each compilation unit, even if it is included more than once using #include. |
| 2 | This is the most important declaration: We declare a type PFraction that is a pointer to a struct.
We need this declaration to be able to define the prototypes of the interface functions.
The compiler is satisfied even if it does not know the concrete members of the struct Fraction in this compilation unit, because it handles all pointers to structs the same way. |
| 3 | The following prototypes describe the whole interface of our ADT. |
Note that we use the following conventions:
-
All method names start with
Fraction_to denote that they belong to this ADT. -
The first argument of all functions that use an existing fraction object is called
_this, because later in C++, the pointer will be called similarly.
Fraction.c:
#include <stdlib.h>
#include <stdio.h>
#include "Fraction.h" (1)

struct Fraction { (2)
    int num;    // numerator
    int denom;  // denominator
};

(3)
// private prototypes (helper functions; only visible in the module)
static void checkSign(PFraction _this);    // make denominator positive
static void reduce(PFraction _this);       // reduce the fraction using GCD
static int calcGCD(int val1, int val2);    // greatest common divisor

(4)
// Implementation of the interface
PFraction Fraction_create(int num, int denom){
    PFraction _this = NULL;
    _this = (PFraction) malloc(sizeof(struct Fraction));
    if (_this != NULL) {
        if(Fraction_set(_this, num, denom) == 0){
            _this->num = 0;
            _this->denom = 1;
        }
    } else {
        printf("\nALLOCATION-ERROR\n");
    }
    return _this;
}

int Fraction_set(PFraction _this, int num, int denom){
    int retVal = 0;
    if (denom == 0) {
        printf("\nInvalid denominator. Operation canceled.\n");
    } else {
        _this->num = num;
        _this->denom = denom;
        checkSign(_this);
        reduce(_this);
        retVal = 1;
    }
    return retVal;
}

int  Fraction_getNumerator(PFraction _this){
    return _this->num;
}

int  Fraction_getDenominator(PFraction _this){
    return _this->denom;
}

void Fraction_show(PFraction _this){
    printf("(%d/%d)", _this->num, _this->denom);
}

PFraction Fraction_multiplyWith(PFraction _this, PFraction f){
    return Fraction_create(_this->num * f->num, _this->denom * f->denom);
}

void Fraction_delete(PFraction _this) {
    free(_this);
}

// Implementation of the helper functions
void checkSign(PFraction _this){
    if(_this->denom < 0){
        _this->num = -(_this->num);
        _this->denom = -(_this->denom);
    }
}

void reduce(PFraction _this){
    int gcd;

    if (_this->num == 0) {
        _this->denom = 1;
    } else {
        if (_this->num < 0) {
            gcd = calcGCD(-(_this->num), _this->denom);
        } else {
            gcd = calcGCD(_this->num, _this->denom);
        }
        if (gcd != 1) {
            _this->num /= gcd;
            _this->denom /= gcd;
        }
    }
}


// works for positive numbers only!
int calcGCD(int val1, int val2){
    int retVal = 1;
    if(val1 == val2) {
        retVal = val1;
    } else {
        if(val1 > val2) {
            retVal = calcGCD(val1-val2, val2);
        } else {
            retVal = calcGCD(val2-val1, val1);
        }
    }
    return retVal;
}| 1 | In this file we include the header file because it contains all the prototypes already and the declaration of PFraction. |
| 2 | Now we have to declare the members of struct Fraction, because in this file we need to access these members when implementing the ADT’s methods. |
| 3 | If we need additional functions in this file, we can declare additional prototypes here.
In this case, these are helper functions needed to implement the ADT’s methods, but they should not be called from client code, therefore they are not in Fraction.h and additionally use the static keyword. |
| 4 | Now follows the implementation of all the ADT’s methods. |
Finally, in our main program, the fraction is very easy to use.
main.c:
#include <stdio.h>
#include "Fraction.h" (1)

int main() {
    PFraction f1, f2, f3; (2)

    f1 = Fraction_create(4, -6);   // stored as (-2/3) (3)
    f2 = Fraction_create(-3, -4);  // stored as (3/4)

    (4)
    f3 = Fraction_multiplyWith(f1, f2);  // creates a new fraction instance

    (5)
    Fraction_show(f1);
    printf(" * ");
    Fraction_show(f2);
    printf(" = ");
    Fraction_show(f3);

    Fraction_delete(f1);
    Fraction_delete(f2);
    Fraction_delete(f3);
}| 1 | Each program that wants to use the fraction ADT needs to include the corresponding header file. |
| 2 | We declare three fraction pointers. |
| 3 | We initialize f1 and f2 by creating fraction instances (memory is allocated in the background). |
| 4 | We multiply f1 with f2 and receive a new fraction instance f3. |
| 5 | We print all thee instances' values. |
|
Advantages for the User
|
8. File-based Input/Output
8.1. Introduction
Until now, we had no way to store information from our programs in a permanent way. Everything computed by our program or entered into the program by a user was lost whenever the program terminated. File-based input and output functions will allow us to store data on the hard disk and read data from the hard disk.
This is done by writing a file or reading from a file.
|
What is a file?
A file is an abstraction that the operating system provides to access data from outside the program, usually stored on the hard disk. We look at files as a series of bytes that represent the file’s content. Similar to an array, each byte can be numbered with an index. 
There is no further information encoded in the file. What those bytes actually mean depends on the interpretation of the program or human reading it. Can you guess what the content of the file depicted above says? |
|
Filename Extensions
This is the reason why some operating systems like Microsoft Windows use a part of the file name (the extension) to indicate how the content of a file should be interpreted. For example, the name Other operating systems like Unix/Linux and macOS store additional meta-data and/or inspect the first few bytes of a file (many file types start with a characteristic sequence of bytes, so-called “magic numbers”) to find out the type of a file. |
8.2. Text Files vs. Binary Files
If you want to store the number 2000 in a file, there are two obvious ways:
-
You store the indidual bits that make up the number 2000 (so you have to convert it into binary code). The decimal number 2000 is the binary number
11111010000. So you need two bytes to store the number:
-
You store the ASCII values of the individual digits
'2','0','0'and'0'. The character'2'is represented in the ASCII using the number 50 (decimal) or 32 (hexadecimal) and'0'is represented by 48 (dec) or 30 (hex).So you need four bytes to store the number:

Which version is better?
The first one is obviously shorter, thus saving memory. That’s why most files we deal with are stored as “binary”, e.g. PDF files, images, programs, videos, …
However, text files (version 2 from above, sometimes also called “plain text”) are like the “least common denominator” of files. You can edit text files with every text editor and every computer can read them. This is the reason why formats like HTML, CSS or XML that are used around the world, are text-based.
|
The encoding problem
There is, however, one problem if you want to use text files containing characters outside the ASCII range. Different countries and/or computer systems use different “encodings” (mappings) from characters outside the ASCII range (like ö, ä, ü or ć, č, ç, …) to binary numbers. A plain-text file contains no indication which system was used to store those characters, so you either have to know or guess (there are algorithms to guess the encoding of a text file). Thankfully, in the last decade the world seems to have agreed on a common system called Unicode (or UTF-8), reducing the amount of guesswork and/or recoding when reading plain-text files. |
|
C does not support Unicode/UTF-8!
Without any third-party libraries, your C compiler will most probably not have a good/full support of the UTF-8 encoding. UTF-8 uses a variable (one to four) number of bytes per character, depending on the character. Characters in the ASCII range use one byte and have the same value as in the ASCII code, seldomly used characters can have up to four bytes. As a result, the simple relation number of bytes in a string == number of characters does not hold any longer and things get complicated. We will therefore refrain from using any characters outside the ASCII range! |
8.3. Line Endings: Windows vs. Unix
For historic reasons, there are two characters in the ASCII table that are used for encoding the end of a line:
- LF
-
Line feed (ASCII value decimal 10, hex 0A)
- CR
-
Carriage return (ASCII value decimal 13, hex 0D)
Unfortunately, different operating systems use different combinations of CR and LF to encode a line ending.
- Windows
-
Both CR and LF symbolize the end of a line.
- Linux, Unix, macOS
-
Just LF is used (saves one byte of memory per line).
- MacOS classic
-
Just the CR symbol was used (MacOS Classic is not used any longer, it was the version before Mac OS X)
File access functions in Windows try to hide the fact that there are actually two bytes written for a \n character if you write a text file (the reverse is done on reading a file).
We will discuss the details in section Text Input/Output.
8.4. File Access in C
There are actually two different ways of accessing files in C.
- High-level access
-
The C library provides sort of an abstract data type (ADT) called
FILEand standardized access functions. The functions are independent of the operating system used and are defined instdio.h. - Low-level access
-
Functions are OS dependent, there is no buffering and no abstraction. Therefore these functions are harder to use.
We will focus on the high-level functions only!
The FILE data type (a struct) is used to store various information about a file that is currently “opened” in the program.
It contains
-
A pointer to the buffer where a copy of (parts of) the file are stored in the RAM.
-
The buffer size.
-
A position indicator (the index of the next character in the buffer that will be read or written)
-
Status flags (is the file opened for reading or writing, is the position at the end of the file, …)
You should never attempt to access any members of FILE directly!

|
A file is a stream
Because we cannot access bytes in the file buffer arbitrarily but just by moving the read/write position we call a file a stream. |
8.5. Opening and Closing Files
Before you can manipulate a file’s content you have to “open” it.
This is done using the function fopen(…).
8.5.1. fopen
Prototype:
FILE * fopen(char *name, char *mode)where
-
nameis a string containing the filename of the file to open, -
modeis a string indicating how the file should be opened.
fopen returns NULL if the file could not be opened, otherwise a pointer to a FILE struct.
The mode is defined as follows:
"r"read: Open file for input operations. The file must exist.
"w"write: Create an empty file for output operations. If a file with the same name already exists, its contents are discarded and the file is treated as a new empty file.
"a"append: Open file for output at the end of a file. Output operations always write data at the end of the file, expanding it. Repositioning operations (fseek, fsetpos, rewind) are ignored. The file is created if it does not exist.
"r+"read/update: Open a file for update (both for input and output). The file must exist.
"w+"write/update: Create an empty file and open it for update (both for input and output). If a file with the same name already exists its contents are discarded and the file is treated as a new empty file.
"a+"append/update: Open a file for update (both for input and output) with all output operations writing data at the end of the file. Repositioning operations (fseek, fsetpos, rewind) affects the next input operations, but output operations move the position back to the end of file. The file is created if it does not exist.
With the mode specifiers above the file is open as a text file. In order to open a file as a binary file, a
"b"character has to be included in the mode string. This additional"b"character can either be appended at the end of the string (thus making the following compound modes:"rb","wb","ab","r+b","w+b","a+b") or be inserted between the letter and the"+"sign for the mixed modes ("rb+","wb+","ab+").If additional characters follow the sequence, the behavior depends on the library implementation: some implementations may ignore additional characters so that for example an additional
"t"(sometimes used to explicitly state a text file) is accepted.
|
The
"b" character is only relevant on WindowsIn Windows, the read and write functions translate between CRLF (two bytes for a line ending) and LF if you open a file in text mode. In Unix/Linux/macOS, since files are stored using LF only, no translation is necessary. Hence, opening a file in text or binary mode makes no difference! |
Examples
FILE *fp = fopen("test.dat", "rb"); // open test.dat for reading in binary mode
FILE *fp = fopen("test.txt", "w"); // open test.txt for writing in text mode
FILE *fp = fopen("C:\\Users\\Max\\Desktop\\example.csv", "a"); // open example.csv in append mode
FILE *fp = fopen("C:\\Users\\Max\\Desktop\\example.csv", "a+b"); // open example.csv in binary append mode
8.5.2. fclose
When you are finished reading and/or writing from a file, you should close the file using fclose(…).
Closing a file writes all information from the buffer back to the file on the hard disk and discards the buffer.
Prototype:
int fclose (FILE * fp);fclose expects a FILE pointer from fopen and returns EOF (a constant usually defined as -1) if the close operation fails and 0 if it succeeds. The return value is usually not checked.
Example
#include <stdio.h>
int main () {
	FILE * fp = fopen ("myfile.txt","w");
	if(!fp) {
		printf("Error opening the file myfile.txt for writing!");
		return -1;
	}
  	// do something with the file
 	fclose (fp);
 	return 0;
}
8.5.3. fcloseall
At the end of the program, all files are closed automatically. Alternatively, you can call
void fcloseall(void);to close all open files.
8.6. Binary Input/Output
We will first look at the binary input/output functions, sometimes also called blockwise input/output functions as they read/write blocks of bytes at once.
|
Use Binary File Mode
For these functions to work properly you need to open a file in binary mode, e.g. use |
8.6.1. Writing to a file
int fwrite(void *buffer, int size, int count, FILE *fp);Arguments:
buffer-
Address of a memory region containing the information that should be written to the file.
size-
Number of bytes of one block that should be read from the address
bufferand written to the file. count-
Number of blocks of size
sizethat should be read frombufferand written to the file. So in totalsize * countbytes are written. fp-
File pointer of the file that gets written to.
Return value: Number of blocks that were actually written to the file.
If this number is different from the count argument, something went wrong.
Example
#include <stdio.h>
#include <stdlib.h>

typedef struct {
    int x;
    int y;
} TPoint;

int main() {
    TPoint p = {3, 7};
    FILE *fp = fopen("point.dat", "wb");
    if(!fp) {
        printf("Error opening point.dat for writing!");
        return EXIT_FAILURE;
    }
    fwrite(&p, sizeof(TPoint), 1, fp);
    fclose(fp);
    return EXIT_SUCCESS;
}
In this example, one TPoint record containing two ints is written to the file point.dat.
However, if you open that file with a text editor, you will not see anything (useful), because the bytes that were written do not correspond to meaningful ASCII characters.
To look at the file’s content you need a so-called hex editor.
You can install a hex editor on your PC or even use a web-based one like https://hexed.it.

A locally installed hexeditor would print the file like this. You can see nearly the same information without having to upload the file each time.
> hexdump point.dat
0000000 03 00 00 00 07 00 00 00
0000008
So let’s look at the output.
The file has a size of 8 bytes, so each integer needs 4 bytes as usual.
The value 3 is printed as 03 00 00 00, shouldn’t that be 00 00 00 03?
The reason for this is that this PC (Intel x86/x64) uses the so-called little-endian format, where the highest-valued byte of a number (0x0A in the example below) is stored at the highest memory address (4713).
The following figure illustrates that concept:

|
Endianness
Of course, there are also computer systems that store the bytes the other way around — called big-endian. There is no right or wrong way of doing it, and there are even computer systems that use a mixed form or can switch between the variants. A binary file does not contain any hint of whether little-endian or big-endian format has been used. If you transfer a file between different architectures you have to know which one has been used (and maybe convert between little and big endian). |
8.6.2. Reading from a file
int fread (void *buffer, int size, int count, FILE *fp);The arguments are the same as for fwrite.
The return value is the number of blocks that have been read successfully.
If this number is different from count, then the end of the file has been reached before all objects could be read.
|
Ensure a large enough buffer!
You have to make sure that the buffer that you pass as the first argument is large enough (at least |
Example
Continuing the example from above, the following program would read back the TPoint variable from the file.
int main() {
    TPoint p;
    FILE *fp = fopen("point.dat", "rb");
    if(!fp) {
        printf("Error opening point.dat for reading!");
        return EXIT_FAILURE;
    }
    fread(&p, sizeof(TPoint), 1, fp);
    fclose(fp);
    printf("Point: %d/%d\n", p.x, p.y);
    return EXIT_SUCCESS;
}
Output:
Point: 3/78.6.3. Random Access
The read/write position of the FILE structure can be changed directly.
This enables you to read or write certain blocks in the file individually, instead of having to always read/write the whole file.
long ftell (FILE * fp);returns the current read/write position of the file fp (the byte number that would be read/written next).
int fseek (FILE * fp, long offset, int origin);moves the current read/write position of fp to offset, where offset (which can also be negative if it makes sense) is relative to an origin.
origin can be one of the following constants:
|
the offset is relative to the beginning of the file |
|
the offset is relative to the current position in the file |
|
the offset is relative to the end of the file. Please note that not all C compilers support SEEK_END! |
If successful, the function returns zero. Otherwise, it returns a non-zero value.

After a call fseek(fp, 3, SEEK_SET):

|
Use Random Access only in Binary Mode
Due to the translations that might happen when opening files in text mode (see Text Input/Output), the read/write position and the actual byte number in the file might not correspond for text files. Do not use |
|
Moving the read/write position to the beginning
Instead of |
|
Finding out the number of records in a file
If your compiler/library supports Why does this work? |
8.7. Text Input/Output
While the functions fread and fwrite are in principle enough to read and write files (of course those functions can also be used to write characters), there are some more functions for text-based input/output.
Actually, there are three different classes of functions:
-
Character-based:
fputc/fgetc -
Line-based:
fputs/fgets -
Formatted:
fprintf/fscanf
8.7.1. Character-based Text Input/Output
int fputc(int c, FILE *fp);Writes the character c to the file associated with fp.
int fgetc(FILE *fp);Reads a character from the file associated with fp and returns it.
If there was an error reading from the file (e.g., the end of the file has been reached), fgetc returns EOF.
|
Checking for End-of-File
You can check whether the last read operation (e.g.
|
Example
#include <stdio.h>
#include <stdlib.h>

int main() {
    FILE* fp = fopen("example.txt", "w");
    if(!fp) {
        printf("Error opening example.txt for writing!");
        return EXIT_FAILURE;
    }
    fputc('a', fp);
    fputc('\n', fp);
    fputc('b', fp);
    fclose(fp);

    fp = fopen("example.txt", "r");
    char c;
    while((c = fgetc(fp)) != EOF) {
        printf("Read character: >%c< (%d)\n", c, c);
    }
    return EXIT_SUCCESS;
}
Output:
Read character: >a< (97)
Read character: >
< (10)
Read character: >b< (98)
If you execute the program on Unix/Linux/macOS, you will get the following file:
> hexdump example.txt
0000000 61 0a 62
0000003
If you execute the program on Windows, you will get the following file:
> hexdump example.txt
0000000 61 0d 0a 62
0000004
Nevertheless, the output of the program is the same on all operating systems. Why?
Answer:
When using text mode, the fputc in Windows actually writes two bytes (CR and LF, 0x0D and 0x0A) for a '\n' (LF) character, while the other operating systems versions just write LF (0x0A).
But the fgetc function does the same translation in the opposite direction: In Windows it reads two bytes (CR and LF) but returns only one: '\n' (LF).
8.7.2. Line-based Text Input/Output
int fputs(char *s, FILE *fp);Writes the string s to the file associated with fp.
The NULL terminator ('\0') is not written to the file.
fputs returns EOF on error, a non-negative value otherwise.
char *fgets(char *s, int n, FILE *fp);Reads characters from the file associated with fp and stores them as a C string in s until n-1 characters have been read or either a newline or the end-of-file is reached, whichever happens first.
A newline character makes fgets stop reading, but it is considered a valid character by the function and included in the string copied to s.
A terminating NULL character is automatically appended after the characters copied to s.
Return value: On success, the function returns s.
If the end-of-file is encountered while attempting to read a character, the EOF indicator is set (use feof to check).
If this happens before any characters could be read, the pointer returned is a NULL pointer (and the contents of s remain unchanged).
Example
int main() {
    FILE* fp = fopen("example.txt", "w");
    if(!fp) {
        printf("Error opening example.txt for writing!");
        return EXIT_FAILURE;
    }
    fputs("Hello\n", fp);
    fputs("World!", fp);
    fclose(fp);
    fp = fopen("example.txt", "r");
    char buf[20];
    while(fgets(buf, 20, fp) != NULL) {
        printf("Read Line: >%s<\n", buf);
    }
    return EXIT_SUCCESS;
}
Output:
Read Line: >Hello
<
Read Line: >World!<
File content: (Unix/Linux/macOS)
> hexdump example.txt
0000000 48 65 6c 6c 6f 0a 57 6f 72 6c 64 21
000000c
> cat example.txt
Hello
World!
Question: How do the file and the output look like on Windows?
8.7.3. Formatted Text Input/Output
int fprintf(FILE *fp, char *formatstring, ...);int fscanf(FILE *fp, char *formatstring, ...);The functions fprintf and fscanf work like their printf and scanf counterparts, except that the do not write/print to the screen but to the file associated by fp.
Return Value:
fprintf returns the total number of characters written on success.
If a writing error occurs, a negative number is returned.
fscanf returns the number of items of the argument list successfully filled. This count can match the expected number of items or be less (even zero) due to a matching failure, a reading error, or the reach of the end-of-file. If a reading error happens or the end-of-file is reached while reading, the proper indicator is set (feof or ferror). And, if either happens before any data could be successfully read, EOF is returned.
Example
int main() {
    FILE* fp = fopen("example.txt", "w");
    if(!fp) {
        printf("Error opening example.txt for writing!");
        return EXIT_FAILURE;
    }
    fprintf(fp, "%f %f", 3.14, 5.678);
    fclose(fp);
    fp = fopen("example.txt", "r");
    float x,y;
    int r = fscanf(fp, "%f %f", &x, &y);
    printf("fscanf returned: %d\n", r);
    printf("Values read: %f, %f", x, y);
    return EXIT_SUCCESS;
}
Output:
fscanf returned: 2
Values read: 3.140000, 5.678000
File content: (Unix/Linux/macOS)
> hexdump example.txt
0000000 33 2e 31 34 30 30 30 30 20 35 2e 36 37 38 30 30
0000010 30
0000011
> cat example.txt
3.140000 5.678000
8.8. Summary of High-level File-Handling Functions
|
opens a file |
|
closes a file |
|
character-based write and read |
|
line-based (string-based) write and read |
|
formatted write and read |
|
block-wise (binary) write and read |
|
returns the current read/write position |
|
changes the read/write position |
|
checks if the end-of-file has been reached |